Friday, April 27, 2012

My Ruffley Table Runner- Made with my Rolled Hem Foot:)

Here is the tutorial I promised many moons ago :)
I'm home with a sick kid, so I figured today is the perfect day to take a few minutes and show you all what I did.
First, measure the table you want to put your runner on.  Do you want it to hang over? If so, add that to your measurements. Then add 2 inches to each side. You will need TWO INCHES ON EACH SIDE :)
When you have your size, cut two pieces of fabric of your choice, one for the front, one for the back of your runner. I used grey on the back of my runner, so I cut one of my rectangles in grey, one in yellow stripe for the top. 

Then cut  the top piece in half, right down the middle. Set the other piece aside, for just a minute.


Pick your ruffle color,  which will be 4 inches wide. For length, measure the side of your runner, top to bottom and multiply by 2. I like to add a few extra inches to make it extra ruffley. CUT THREE OF THESE, BUT SET ASIDE TWO FOR LATER.

Set your sewing machine to a basting stitch, or the longest stitch you have. Sew along the edge of ONE OF YOUR ruffle pieces.  Take it out and pull the bottom thread to make your piece ruffley. Repeat down the other side of the ruffle. *important: don't forget to reset your stitches...you don't want to baste the entire runner together...it will fall apart on you :)
Once you have a ruffle, put the right side side of your ruffle along the right side of one of your runner front rectangles. I pinned it in place to make sure the ruffles stayed when I sewed. This also keeps your pieces from slipping around while you sew.
Repeat on the other side of the ruffle, and the other rectangle, until you have one rectangle that looks like this. (below) Don't worry about whether or not the ruffle is even on both sides. Having it gather different on both sides gives it a nice look. Then iron your ruffle down , aligning the whole thing back into a nice rectangle. It should resemble a runner right now...

Now is when I attached my ruffle foot to my machine. We will be making the ruffles that run down the two ends of the runner.  I love ruffles!

Finish one side of your ruffle with the rolled hem foot.
Then repeat on the other ruffle. This pic shows one ruffle done, laying next to the one I'm working on, so you can see what the finished edge looks like.

Next I ironed a think piece of interfacing to the bottom piece of my runner. I just wanted a little bit of substance to the runner, so you can skip this step if you don't have any interfacing. (my backside is grey, just to clarify)
Next, I sewed my ruffles to the top piece. I only did this, because I wasn't planning on putting on a backing. If you choose not to put on a back, you will be done at this step.  If you want a backside on your runner, then just pin the ruffle in place. Remember, the right side  of the ruffle will be on the right side of the fabric, lining up the raw edges. I tried to show it in the picture below by folding back the runner after I sewed it. {sorry, I'm horrible at explaining things}
*if you are not adding a backing to your runner, this will be your last step. 
Topstitch along the ruffles, as shown below. This adds a finished look and helps strengthen the runner.
 If you ARE adding a backing,  don't topstitch yet...keep reading ;)

To add your backing

Sandwich your layers together, right sides facing each other. Make sure that you tuck your ruffle in between the layers, or you will have a ruffle INSIDE your runner when you turn it out. I know...I did this! DUH!!!
Pin all around the edges, leaving about 4 inches on one side to turn. I trimmed along the outside before I sewed, so it would be easier to sew a straight line. My grey rectangle was now a totally different size, so a smart person would make the back piece at this point. But I felt like the uncut piece gives you a better idea of the size you intended for the runner to be, so you can use that as your guide.
Turn out, and look at your runner! It should look pretty by now :) But we're not quite there yet...

Next, iron everything really good, so your edges are crisp and even, and that your hole from turning is tucked in and invisible. Pin everything in place....you are almost done! Topstitch along all 4 sides of the runner.
Topstitch along both sides of the middle ruffle for a nice, finished look.
This is the back, after I top stitched. Nice, isn't it???
Voila! Instant pretty on my table. Well, maybe not instant, but mine was done in less than an hour ;)

If you complete this, I'd LOVE to see your pics! Feel free to post a link here, or post a pic on my FB page 

And please, if my instructions are unclear, let me know so I can fix them ;)

Have a great day!
Angie

Monday, April 23, 2012

*New* Sale Section on my Website!

If you visit gathered-sown.com, you will find my newest addition....my quick sale section! This is where I will be listing items that are samples, one of a kinds, or styles/fabrics that I am phasing out. 

The best news??? 

The micro shop will be ever changing.

 Everytime one thing sells, I will add another. There will always be 5 items in that shop!

Each item in the Quick Sale section will be marked down,

 so not only do you get a really fun bag, but you get it for less than anyone else will! 
Win-win!
Image of Blue/White Pleated Cross Body Convertible Bag
Every once in a while, (because I love my customers SO MUCH!) as a bonus thank you, I will be adding a current, straight from my etsy shop item! This will be random and unannounced, so you'll have to check the Quick Sale shop often ;)

Questions? Let me know. If not, have fun, and I'd LOVE it if you told your friends,wink!

Thanks!
Angie

Wednesday, April 4, 2012

Leather Ipad Case Giveaway @ Newlyweds on a Budget

I've met the sweetest girl.....


Her name is Kari...
She's married to a guy named Mojo...
well, really his name is Morgan, but I like it when she calls him Mojo <3


Kari and I met through blogging and I love her to pieces!

To help her celebrate a milestone on her "you never know what she's creating now" kind of blog,
I'm giving one of her readers a FREE leather Ipad/ ereader cover!

Please help us celebrate and help me spread the love of Kari by hopping over to Newlyweds on a Budget and telling her I sent you!

Thanks for spreading the word!!


Tuesday, April 3, 2012

My Favorite Sewing Tool Right Now

So it's no secret....I like ruffles, pleats and other girly details on ALL of my work. So I also love any tools that will make my life easier when spending so much time on such details.
Enter....the rolled hem foot:

This scnazzy foot has saved me countless hours of ironing, folding, re-ironing etc. 
What it does is roll two teensy tiny folds in your fabric, giving it a finished hem. A finished hem that looks SO MUCH BETTER than anything I could do by hand. I'm able to feed ruffles through at break neck speeds!

I'm not going to lie: There is a learning curve to this foot. You have to figure out just the right way to hold the fabric, but once you figure it out, you will use this foot:

 all. the. time.
Since I discovered this inexpensive tool, even home dec tasks like these don't seem nearly as daunting.
source: DIY design
source: Holly Molly & co
source: Elle apparel

source: sweetwater

Next post, I will be showing you a tutorial for a somewhat simple table runner I made using this nifty tool....

Monday, March 19, 2012

Wristlet Giveaway

If you have a minute today, please stop by Love of family and home, the blog of my friend Tonya....

She  is hosting a giveaway this week, featuring one of my wristlets! Now through Thursday the 22nd, you have a chance to win. And while you are there, you can pick up a coupon code that I made for her readers, to use on anything in my shop. Don't forget to tell her that I sent you ;)

I was so proud of her a couple of weeks ago when one of her craft projects was featured in a multi-page spread in Women's Day! Ryan and I were at Walmart the other day, I opened it up and said "I know her!"
You can see the article on her post titled "big,fat, exciting news!" The only bad news??? As I'm writing this and seeing her cute pics, I also see my arch enemy. My WORST favorite vegetable. Peas. On the cover. But if you can get past the wrinkly, squishy,rolley polley grossness, you will be treated to a fun article about a great gal!! ;)  Her idea for a closet office is something almost anyone can try, no matter how tight your living quarters! Her office is in a space that is 19.5" by 26 ". That's INCHES. And she did it for less than $100. Wonder woman!

Enjoy, and best of luck to all who enter!
Angie

Friday, March 9, 2012

Spring 2012 Leather Pieces

Here is the post I've been promising for weeks!
I've been drowning in orders {thank you, by the way!}
And on the side trying to design and create my spring leather looks.
Without any further Adieu.....here they are!

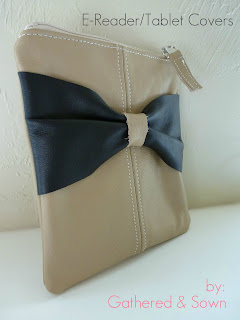
1. The Leather Bow Clutch
$36.50
A contemporary, luxurious update from our best selling Wristlet, this clutch is longer, leaner and melts in your hand!
Detailed with a leather bow across the front, the accent is cinched in the middle with a piece of leather that matches the body of the clutch. I added contrast stitching to both the front and the back of the clutch for a little added character.
The wrist strap is layered leather and finished with a silver lobster clasp which attaches to the zipper.
Inside you will find two slip pockets to organize your important cards, as well as ample space for your phone, coin purse and more.
Approx size is 9 inches x 4.25inches
the strap is approx. 10 inches when opened.


available colors:black with tan   Camel with chocolate   chocolate with camel


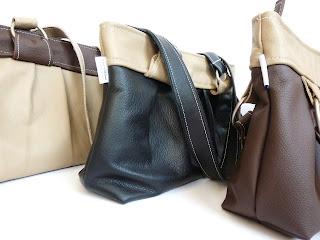
                                                     2. Pleated Leather Peek-a-Boo Tote
$68.50

You won't see another bag like yours when you are carrying this delightful peek-a-boo tote!
Designed with the busy girl in mind, I wanted to make a bag that would fit everything she needs for the day, but yet has that signature Gathered & Sown quirky style!

The body and straps of the bag are 100% leather. But in between the leather folds are an accent of a coordinating cotton print. 
Inside you will find slip pockets which you can use to organize and keep your essentials within easy reach.

Perfect as a diaper bag, bible study bag, work tote or large purse. No matter what your day holds, you will turn heads and look cute as you go about it!

3. Oversized Leather Shoulder Bag
$79.80
I am always being asked if I have any "big" bags available, and this is my response!
Perfect as a diaper bag, work bag, laptop bag, large purse or small carry-on.
I created this bag with 100% leather on the top, with contrast stitching accents. Then I use a coordinating cotton print on the bottom, giving it a splash of color and unique personality.
The zipper top with oversized leather zipper pull will keep everything inside, and the handles attached on metal rings are strong as well as  pretty.


4. Pleated Leather Handbag
$64.50
Our popular pleated handbag design blended seamlessly with the leather. 
The pleats are soft, yet make a beautiful statement, and the accent of the sturdy metal rings adds a wink of femininity to this everyday bag. 
One of my favorite design details when working with leather is contrast stitching, so I use it in abundance.

The perfect size for an everyday bag, you will easily fit a large wallet inside, along with your phone and other necessities.
Lined with 100% cotton, you will find 2 slip pockets inside to hold help you stay organized, and the recessed zipper closure with over sized leather pull will keep your items secure. 
The two straps measure approx. 19 1/2 inches each, with a 9 1/2 inch drop
Approx. Bag size is
11 inches wide 7 inches tall 3 inches deep


5.  Leather E-Reader/Tablet Covers
Made to order
$35
Looking for a chic way to protect your favorite device? Drop it in to one of our upholstery grade leather cases. Accented with a simple contrasting bow and stitching, this case is not to busy, yet eye catching at the same time. Fully lined with a cotton lining, with fleece on the front between the lining and cover, to further protect your screen. Top it off with a zip closure and leather zipper pull, you can carry it with you and not worry about it slipping out of its case.


I will create your case at the time of your order. With your order, please specify the item I'm creating it for, as well as the actual dimensions: Inches across the front, inches from top to bottom, and finally depth of the device. 


 Each bag in my leather collection is a limited edition bag, and unless noted as "made to order" they are one of a kind and only available through my etsy shop, or by contacting me directly.

Phew! I think that's it....for now! On to finish my pile of orders, but I promise, I'm always making new stuff. The fun never ends, wink!

Thanks for checking these out, and thanks in advance if you help me spread the word ;)

Thursday, March 8, 2012

The Long Awaited Leather Reveal!

I know, I know, it took forever, but believe me when I say, good things come to those who wait ;)

I have found leather is so much fun to work with, and it has really given me a fresh sense of energy in my work. It's a completely different look, the accents in the details are completely new and every step takes a little longer, but I am having so much fun with this stuff!


The leather I got is really nice, pebbled leather. It's upholstery grade which means it's very strong, yet still buttery soft.


 I've been using contrast stitching, pleating, creative folding and accessories  to bring out the personality in each bag I create.

I made a solid black pleated leather handbag for my sister. It nearly killed me. Plain black??? No accents? No ruffles???

But she wanted p.l.a.i.n.

And I will say....I did not hate it!


I know that many of you have been itching to see the new spring line, and I will be posting the new pieces tomorrow, so be watching :)

Thanks!
Angie