1. One of my problems was always forgetting to turn things off. I can't tell you how many times I've left my iron on, or walked away with my sewing machine lights still burning. So I configured my space and cords (of which there are many!) so that they could all be plugged into one surge protector. I checked with my electrician friend, and he assured me that this a perfectly safe:) This way, when I start to work, or finish work, I just flip one switch, and everything turns off! There is also another reason I did this...last summer, while I was working, our house got struck by lightening. Fortunately all of my equipment was fine, but I don't want to take any risks. Now I have only ONE plug to unplug durning a bad storm. Ahhh, easy peace of mind :)
 |
| Now I have only ONE plug to unplug durning a bad storm. Ahhh, easy peace of mind :) |
 |
| I have yet to figure out a chic way to hide all of my cords...any ideas?!?! |
2. I also have all of my supplies stored in this hideous, bright red, professional tool box.
I camoflauged it by hiding it under my ironing table, but it is still an eye sore.
My soulution? A shower curtain, attached with a tension rod.
 |
I also made myself a
floor mat cover out of the same shower curtain to
cover my ugly, industrial rubber floor mat.
Much cuter, I must say!
|
3. I got a great idea for storing my piles and piles of fabric. I made little mini fabric bolts out of foam core board. It is like a mini fabric store on my cutting table. I keep as many of my prints and textures as I can on there, with an extra cabinet of solids or pieces which are way too big for the bolts in my closet. Here is a link to the tutorial where I found the idea...thanks!
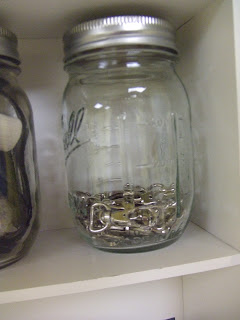
4. After trying a tackle box for my small parts, I came up with the economical and cute idea of using different size mason jars. I love the way this looks!
5. I never had enough room on my ironing board for all of my pieces, so I had the idea of transforming a tabletop into my ironing board. I layered a baby crib mattress, bath towel, and Insulated interfacing. Then to make it look better, I topped it all off with a really cute vintage sheet, cut down to size. This is the table I work at 90% of the time, and it works great for me!
*disclaimer- The steam on your iron WILL RUIN the table top,even with all of the layers. So PLEASE don't try this on a
table you plan to turn back into a table. Capiche??? Good :)
6. Pegboard. Who knew?? I took a scrap of my Dad's old peg board, painted it blue and Voila, I have a place to keep my tools within easy reach, while adding a punch of color to my room at the same time! This would be a great addition to any craft room, and can be customized a gazillion different ways with different hooks, shelves, colors etc. Have fun with it!
So there it is, a few lessons I've learned from my mistakes! If my studio were tidy-er, I would share some more, but I guess that will have to wait until another day!
I hope someone else can take some of these tips and find their own creative way to spruce up their work space. I would love to see pictures ;)


Great Tips!!! I currently do not have a designated "craft space"....my husband is about to kill me, with all the mess around the house! hah....I'll have to keep this post in mind when i finally create my much needed craft room!! Thanks for sharing!!
ReplyDeleteEverything looks great! I know there are lots of ideas in blogs and on Pinterest to hide cords and organize them! If you are ever on there, you can look up my organized board: http://pinterest.com/organizemadefun/
ReplyDeleteYou are probably enjoying all that room! So pretty!
Becky B.
www.organizingmadefun.com
Organizing Made Fun
Jess, I was lucky enough to have a space in my house that the Hubs was wiling to part with so I could carve out a usable work space. I feel so lucky! Becky, I will be checking that out asap! Thanks for the tip
ReplyDeleteI like your craft room, pretty and organized. In the photos, the red toolbox doesn't look "hideous", actually cool enough looking, I'd put it out and put a few other red embellishments around the room.
ReplyDeleteIn defense of the red tool box, I guess it's not hideous...just is a little "harsh" in my decor! Thanks Gail for seeing the good in my toolbox :)
ReplyDeleteCould I be more jealous of your space right now? The answer is NO. No I couldn't. This looks awesome, and any organization tips are helpful! Thanks for posting, your room is AWESOME.
ReplyDeleteThanks! I have to agree ;) But I must confess, right now, it is not as "neat" as it is in the pictures...but that is the beauty of the door. I can close it and no one is the wiser...hehe!
ReplyDeleteI really want a workspace! Thanks for inspiring.
ReplyDeleteThanks for sharing, I'm currently sorting out my desk, sadly not a room, and am trying to juggle it all!
ReplyDeleteI love your space! Thanks for your comment over at www.nestingnewbie.blogspot.com After looking at your great blog, you're right, great minds DO think alike! :)
ReplyDeleteA suggestion for your tool chest: cover the fronts of the drawers with fabric (use modpodge) and spray paint the main body a color you like. I've seen it done with filing cabinets from an office.
ReplyDeleteIroning surface: same idea but won't ruin a table top. Cover a piece of plywood with cotton batting, then an old wool blanket and then canvas (drop cloth from the hardware store). All can be attached with a staple gun. Set on top of your table surface. This works great and is also portable.
Diane, thanks for the GREAT suggestions! The great thing is, my cabinet is hidden underneath my ironing table, so I would only need to do the drawer fronts. Sounds like I have a project...Yay!
ReplyDeleteThanks for all the great tips! I'm in the process of organizing my craft room. Still looking for a few more items to help my organization. Check it out: http://texascottage.blogspot.com/2011/07/craft-room-update.html.
ReplyDeleteI love all your creative re-purposing! Organized without spending a lot of money. It looks great.
ReplyDeleteps Cords are a pesky villain in my life too.
love your space. When we move and I have to redo mine, I just might use some of these ideas. Love the mini bolts especially. and the pegboard.
ReplyDeleteFor wires, sometimes it's not even hiding them, but just organizing them and shortening them so that they are exactly the length they need to be and they aren't hanging loosely in the air. I like to use Velcro's One Wrap (50pcs) http://www.officemax.com/office-supplies/tape-glue-adhesives/tape/velcro/product-ARS24288 for this.
ReplyDeleteThen I like to hang whatever I can to the walls, in an organized manner, using 3M command strips. They have stuff for hanging rolls of cords, hooks for hanging wires. And I use 2 of the big 3M command strips to position the power surge protector in a location on the side of my bed/desk/walls. Keeping them off the ground keeps my rooms looking neat. You can see an example of one of my projects here: http://thediplomaticwife.com/blog/2010/06/26/home-organization-project-1%C2%A0%C2%A02/
Thanks for all the tips on your post. I am still battling with my messy workstation/study/guest BR. Hope to get it all under control soon!
I'm thinking of actually drilling holes in my table to run the cords down through, so they all fall at the same place. Then I like the idea of the velcro one wrap to keep them a little tighter. Thanks so much for all of the great tips, you guys rock!
ReplyDeleteLove how you've organized your space. Years ago I was trying to become an extreme couponer. I had a room so full of boxtops etc that it became a fire hazard! I gave it up, at my husbands request. Had I not, I would have needed an overhaul too.
ReplyDeleteSinea....
ReplyDeleteThat is too funny. That would be EXTREME, extreme couponing!Any good thing that becomes a fire hazard is likely not a good thing...That sounds like words of wisdom..LOL! Thanks for stopping by :)
Great tips! It looks great. Can't wait to have a designated space to set up like that :)
ReplyDelete